26 jul 2011

Lightweigt, effective earprotection

A lot of people use the issued Comtac active earprotection headsets but when they have to be used in conjunction with the issued Schubert helmet we get into trouble.
In searching for a lightweight, effective, comfortable earprotection, I came across the Surefire Earpro EP3 Sonic Defenders.


I've been using these for about 2 years now and they are just great. No more hassle with headset and helmet. They fit perfect and can be used the whole day long.

The earpro also provides an additional stopper that can be manually inserted for even more protection.

Features
  • 24dB* Noise Reduction Rating (NRR) with stoppers inserted
  • Lowers potentially dangerous noise levels above 85dB
  • Hear safe sound levels (with stoppers out) as if you weren't wearing ear plugs
  • Ergonomic design and double-flange stem design conforms to ear shape for comfort and secure retention
  • Made from hypoallergenic, medical-grade polymer that's soft, durable, and long-lasting
  • Low-profile design allows you to keep them in place while wearing a mask, helmet, hat, or while using phone, headphones, or supplemental hearing muffs
Even for people with bigger or smaller ears, Surefire provides different sizes. (S, M & L)

I bought mine through Ebay but it seems that they are widely available in EU for about 15€
27 apr 2011

Some music after the range

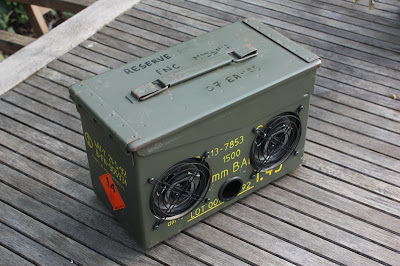
A few months ago I came accross a shop that was producing portable MP3 player in the form of wooden boxes and 50 cal ammo cases. I was keen on the idea and started searching for all the pieces so I could build one of my own.


Items needed:
  • 50 cal ammo case
  • Motorcycle amplifier 12V
  • 5mm MDF plates
  • Velcro
  • Lead battery 12V, 11Ah
  • 2ea 10cm 2 way speakers
  • 2ea 12cm fan protectors
  • Black spray paint
  • Woofer tube
  • Power switch
  • Screws and washers
  • Nuts and bolts
  • Tech 7 glue
  • DIY battery monitor
  • Tri colour LED
  • Audio cable
  • Sanding paper
I started out cutting the speaker and speaker mounting holes on the side of the ammo case. Not forgetting the smaller woofer hole in between. On the side I drilled a hole to install the power switch. When drilling make sure the switch will be positioned so that you can manipulate it from the hole in the side open/closing lever of the ammo case. Then I trimmed the MDF plate so it would fit nicely inside the case. The back plate was trimmed to the full interior length of the case. The previous cut out holes were transferred on the front MDF plate and cut out. Using Tech 7 I glued the MDF plates into place with the exception of the back plate. This should be able to slide out if necessary because I was planning to mount all electronics and battery on it.

In order to check the battery status I looked for a circuit that showed the status through a tri colour led. Green above 11,5V, Orange between 11,5V - 10,8V and red below 10,8V. These values can be changed with the potmeters.
http://kd1jv.qrpradio.com/batmon/batmon.HTM

I made the circuit on a experimental board and drilled a 5mm hole in the woofer tube. From the outside the battery status was visible through the bass tube.
The two fan protectors were sanded and sprayed black. After drying I cured the paint by baking the protectors in the oven for about 20 min at 200°. Try to do this without the misses at home because it tends to smell.

After mounting the speakers, protectors and switch it was time to install all electronics on the back plate. On the left I installed the amplifier with screws and in the middle the battery. The battery is held in place by a self made Velcro harness so changing it isn't a big issue. Mount the battery with the connections to the top so that recharging is easy. On the right I mounted the battery monitor. With this setup the ammo box will also be in balance. The battery alone weighs a couple of kg.

Last but not least I wired everything up and added an Ipod for testing. Closed up the case and the sound was just great.

A nice gadget when maintaining your weapons ;-)


2 mrt 2011

The best of two worlds, the ultimate holster for your sidearm!

During a instruction course in Leopoldsburg I got to know a guy from 1para who was leaving in a couple of weeks for OMLT ops in afghanistan. He was complaining about some shortcomings on the current issue tactical sidearm holster. He was on a quest for the ultimate FN Browning High Power, alias GP (Grand Puisance), holster. One that would draw fast, wasn't pulling constantly your belt down and still would stay in place when running after the bad guys.

You have to know there are dozens of good systems out there but all them have some negative points one way or the other. For example there are only a couple of brands who make holsters for the GP like Fobus and Safariland.
Safariland must be one of the best systems on the market. They use a quick release locking lever to secure the sidearm in the holster wich is made out of strong and durable Kidex.
On the other hand these brands use only one wide strap of webbing to attach the holster to the belt.
Blackhawk was aware of this problem and introduced the CQC system where the platform is atached to the belt with two seperate hinged straps deviding the pullforce on the belt in half.

So we got a winner? .... Nope, they don't make holsters for the GP :-(

What if we merged the two best features of both systems together? Wouldn't that be a nice wedding?.
Here's the result. Holster from Safariland and legpannel from Blackhawk.


20 feb 2011

Belgian Defence acquired the new version of the CAT, "Combat Application Tourniquet". 
The improved features of the CAT are:

-white Self-adhering band with "Time" indications so that the time of fixing the CAT can be noted directly on it. 
-the windlass rod is thickend in the middle because earlier version tended to brake when used under stress.