Posts tonen met het label Gadgets. Alle posts tonen

1 nov 2013

Testing Froglube part 1


Just a few days before the annual weapons inspection I took the liberty to give my issued carbine, a FN FNC M3, a final cleaning session and thought it was a good time to do this using Froglube. I know there are a bunch of reviews out there on the net so I’m not going to repeat everything that has been said at least a hundred times. I’m just going to write down my personal experience with this so called “revolutionary” product.

The first thing you’ll notice when opening the product is the green looking substance and a nice minty smell. The smell is also comparable with the reflex sprays  found at the local pharmacist.  I also had the Froglube “solvent” with me to try out. The solvent, which comes in a spray,  is a completely different product compared to the green Froglube products, being color- and odorless. It almost acts and looks like water.

So I started off with my first test of Froglube. I have to be honest, I’m not a freak when it comes down to super cleaning my weapons. Even the most experienced weapons cleaner will always come to the conclusion that even when his or her weapon is perfectly cleaned, after a week or so, he or she will still  find traces of dirt and carbon released after the gun has sweat for a while.


For the first step of the product application instructions, “preparing your weapon”, it is advised to get rid of all oil based clp’s (Cleaning, Lubricating, (rust)Prevention) using the Froglube solvent. I sprayed a generous amount of solvent especially in the places where normally the grease would be applied. The solvent does what it is supposed to do. After wiping it clean I was left over with a “dry” weapon. Then I started to warm some of the pieces like the bolt, boltholder, gas piston, … with a hairdryer. Froglube is best applied when the metal of the gunparts are handwarm. Apparently the microscopic pores in metal become larger when warm thus giving the Froglube more adherents to the metal. After applying the Froglube I wiped of the excess with a microfiber cloth and I can assure you there was still quite a lot of dirt/carbon that came off.

For cleaning and protecting your weapon you can both use the paste and liquid version. The paste is ideal for applying on bigger surfaces and the liquid is good for all the little crannies but also for lubricating the moving parts en slides. After applying the green CLP, all the metal parts are silky to the touch. It’s like a smooth protection layer but without a greasy film. I even used Froglube on the plastic pistol grip and handguards giving a nice satin finish.  


My first impression of Froglube is very good. It applies very efficiently and really cleans your weapon parts without leaving a greasy mess. As it is an all natural, non-toxic, environmental friendly product you don’t need any gloves to protect your hands whilst cleaning, compared to all other oil based CLP and chemical degreasers. Froglube even claims you could eat their products … But that’s for next time.

Lets hope the inspection goes smooth ;-)

You can buy Froglube at http://www.froglube.be
Use “contact-front” for a 10% discount.

ps: I even gave my Leatherman MUT a cleaning session with Froglube

27 aug 2013

Custom made IR patches

If you are in need of some custom made IR patches, just send us a mail.


4 aug 2013

Announcing Froglube!


Contact-Front is pleased to announce "Froglube".


Froglube is a revolutionary bio-based product that is designed to Clean, Lubricate and Protect (CLP) your guns and more. FrogLube was founded by CPT Larry Lasky, a US Navy Seal (ret), and claims that his product will change the way we take care of our weapons.

It’s almost a 100% natural product  so you can use and apply it with your bare hands. It even comes with a minty smell J. So no more gloves and headache provoking smells.

Froglube CLP is available in a paste and liquid which facilitates the application to your weapon with a brush and/or microfiber cloth. Froglube also has some extra products like a solvent to remove all petroleum based CLP’s and prepare it for the application of Froglube.


After some cleaning sessions of Froglube (detailed guide is on the website) you should notice that your gun will run smoother and cleaning the damn thing will just be a walk in the park. When cleaning, use some liquid CLP on a microfiber cloth, and you’ll notice that the built up carbon will just melt away.

I have to be honest, I still have to test Froglube, but the loads of reviews on the net are a witness that Froglube does what it says. Nevertheless I'll keep you posted.

https://www.youtube.com/watch?v=rGOxNu8YeN4
https://www.youtube.com/watch?v=WqXi947z0Ck
https://www.youtube.com/watch?v=KzuNB2Claf8
https://www.youtube.com/watch?v=aKHwwruKn60
https://www.youtube.com/watch?v=_17e56yJIy4

So if you want to spend less time cleaning and more time shooting your gun then try Froglube.

Froglube Benelux and Contact-Front have teamed up and to celebrate this you will get a 10% discount when ordering from http://www.froglube.be
Use “contact-front” as your discount code.

More info on
http://www.froglube.be

Have fun.


4 apr 2013

Additional IR patches

The response to the IR patches has been overwhelming.
Due to high demand I added some new designs. Custom made patches are also available.

BE Desert + Skull


Custom IR "Call Sign" patches


12 feb 2013

Gear stand

A while ago I saw a photo on the net of a wooden gearstand, easy to make and looked quite cool. Looked like a nice DIY project ;-)

Trying to retrieve the photo I came across the Immenent Threat Solution website which had a article on the stand. http://www.itstactical.com/intellicom/diy/how-to-build-a-tactical-gear-stand/
I based my project on the article and went shopping for some timber and iron.
So what did I need: (length in cm)
One 120 long 9 x 9 post
Two 60 long 2,5 x 9 posts
Four 45 long 3 x 5,5 posts 
20 deckscrews 10 long
20 washers

All the wooden post were standard sizes of 240 cm long and total price was about 40€. Nevertheless you have enough to make two stands. (Sometimes a necessity with all the gear lying arround ;-))

And this is the result:

1 feb 2013

Belgian infrared patches

Infrared patches! Their everywhere! Being coalition forces in Afghanistan or French troops currently deployed in Mali, you can't miss them on the thousands of photos circling the internet.

Used to ID friendly forces at night through the means of night vision equipment and restrict blue on blue incidents they come in all kind of shapes being square, round with a certain silhouette or text or just depicting the soldiers nationality by its flag.

Finding Belgian IR patches is another thing. They are probably non existing … until I decided to produce some of my own.

Size = 7,5x5cm
They have a retroreflective surface for nighttime reflection under normal and IR light and fitted out with a hard sided velcro backing.

Interested? Just give me shout ;-)

The standard colours


Subdued woodland

29 mrt 2012

ZULU NYLON GEAR mega admin pouch

For a while now, I’ve been looking around on the internet for a big enough pouch to accommodate all my small arms instruction gear like whistle, chrono, instruction sheets, safety briefings, markers, ….  A lot of the time I had to search for a piece of equipment  that was stowed in another place but didn’t know where I’d put it. A nice, large enough, means of stowage, would certainly help me with that. A central place to stow everything I need on the range concerning instruction.
I came across the ZULU nylon gear website and saw their mega admin pouch and ordered one. I have to say they send it very fast with tracking, but it was held up by Belgian customs. Accompanied by an extra 28€ of import taxes it finally arrived two weeks after I ordered it. Due to the tracking I could see that it arrived in BEL about two days after I ordered the pouch.
But it was worth the wait!

I ordered a Coyote Brown pouch without the plastic map insert that can be bought as an option. At first glance the admin pouch is very well made with 1000d coated Cordura. Overall dimensions of the mega admin pouch is 23 cm wide x 15 cm tall x 2,5 cm deep

The admin pouch is big enough to accommodate a A5 booklet. Even the width of the pouch is more than enough for a 2 cm wide booklet.


The main compartment is zippered and has elastic fittings and slots for a wide range of extra gear. The two halfs are held together with a adjustable 550 paracord but this can be removed. This feature is handy when the pouch is installed on a chest rig at chest height so that it doesn’t completely fall open, but stays at a desired angle like a tactical desktop ;-)


On the front side, the mega admin pouch also features an extra admin pouch which is completely covered with velcro for attaching your name tab or favorite morale patch. Inside you can again organize your gear due to the elastic fittings. Next to the front pouch there is another universal pouch which can be used to fit a tactical light, multitool, … The Velcro covered flap can be adjusted to your needs or completely removed.


On left, right and bottom sides there are also extra attachment for additional gear.
On the backside there are provision for Molle attachment to be used in conjunction with Malice clips.


Conclusion, I’m very happy with the Zulu Nylon Gear Mega Admin Pouch. Now I have efficient storage for all my instructional range gear.

9 jan 2012

Pmag for the FNC

If you are interested in the weapon & gear scene you've probably heard of MAGPUL. http://www.magpul.com/

MAGPUL is an innovating company which produces accessories for weapons like slings, sights, handguards, stocks, ... They even designed their own weapon system, the MASADA.


One of their most popular items is the Pmag. Made from an impact and crush resistant polymer construction, it was first announced in early 2007. The Pmag is a 30-round 5.56 NATO Polymer MAGazine for AR15/M16 platform weapons. With millions fielded to military, law enforcement, and commercial users, PMAGs have become the de facto standard for magazine reliability and durability. Since 2007 the Pmag underwent a lot of modification to be compatible with other weapon systems than the AR family. Since some time MAGPUL has Pmag M version which is fully compatible with our FN FNC. (theversion marking is visible on the bottom plate of the mag)

I have tried some Pmags and must say they feel light and platic like, because they are ;-) But after shooting a couple of mags I wasimpressed.

They claim to be stoppage free compared to the Stanag metal magazines. I checked both mags and must say that the follower is much smoother on the Pmag and doesn't tilt when pushed on one end.

Neverthless, the goldon rule still stands: Only put 28 rounds in a 30 round magazine.
Even the Pmag tend to jam the FNC when fully loaded.


I've been using them for over a year now and have had no issues what so ever. They come in a variaty of versions and colours and have their own accesories like a dust cap (included) and magpuls.

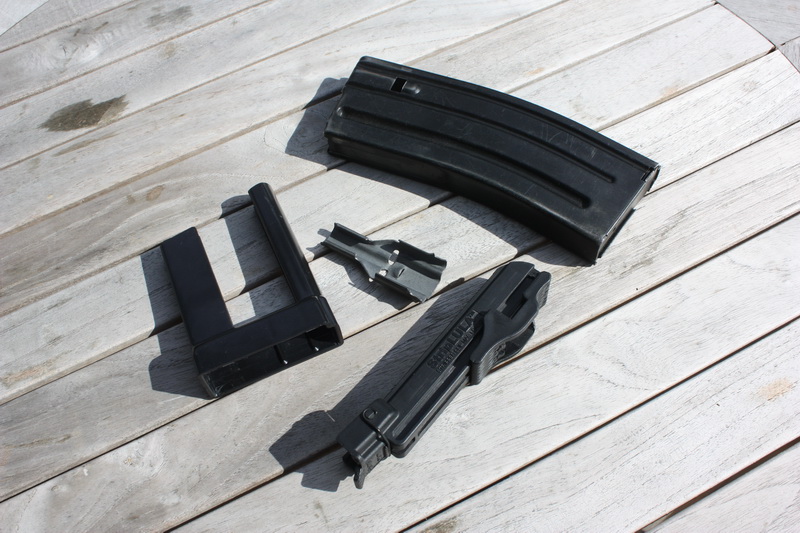
From left to right, Stanag metal mag, standard Pmag, Pmag with maglevel.


Once again, they are tough ;-)

27 apr 2011

Some music after the range

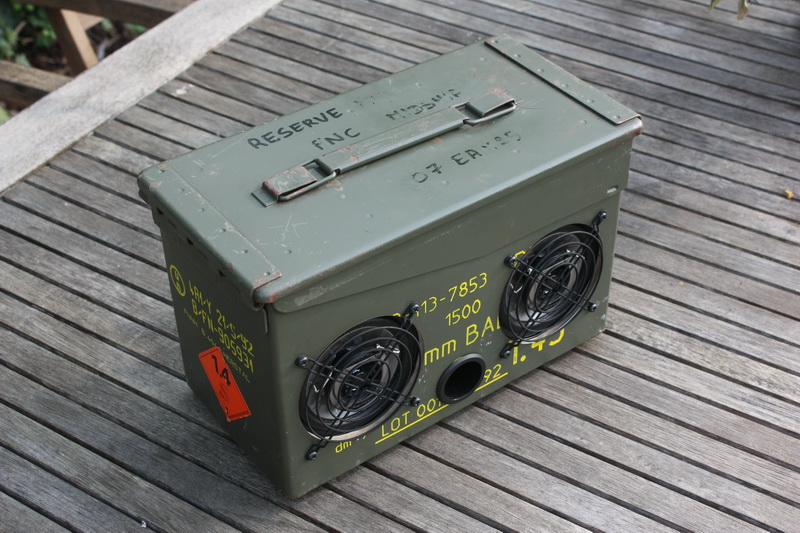
A few months ago I came accross a shop that was producing portable MP3 player in the form of wooden boxes and 50 cal ammo cases. I was keen on the idea and started searching for all the pieces so I could build one of my own.


Items needed:
  • 50 cal ammo case
  • Motorcycle amplifier 12V
  • 5mm MDF plates
  • Velcro
  • Lead battery 12V, 11Ah
  • 2ea 10cm 2 way speakers
  • 2ea 12cm fan protectors
  • Black spray paint
  • Woofer tube
  • Power switch
  • Screws and washers
  • Nuts and bolts
  • Tech 7 glue
  • DIY battery monitor
  • Tri colour LED
  • Audio cable
  • Sanding paper
I started out cutting the speaker and speaker mounting holes on the side of the ammo case. Not forgetting the smaller woofer hole in between. On the side I drilled a hole to install the power switch. When drilling make sure the switch will be positioned so that you can manipulate it from the hole in the side open/closing lever of the ammo case. Then I trimmed the MDF plate so it would fit nicely inside the case. The back plate was trimmed to the full interior length of the case. The previous cut out holes were transferred on the front MDF plate and cut out. Using Tech 7 I glued the MDF plates into place with the exception of the back plate. This should be able to slide out if necessary because I was planning to mount all electronics and battery on it.

In order to check the battery status I looked for a circuit that showed the status through a tri colour led. Green above 11,5V, Orange between 11,5V - 10,8V and red below 10,8V. These values can be changed with the potmeters.
http://kd1jv.qrpradio.com/batmon/batmon.HTM

I made the circuit on a experimental board and drilled a 5mm hole in the woofer tube. From the outside the battery status was visible through the bass tube.
The two fan protectors were sanded and sprayed black. After drying I cured the paint by baking the protectors in the oven for about 20 min at 200°. Try to do this without the misses at home because it tends to smell.

After mounting the speakers, protectors and switch it was time to install all electronics on the back plate. On the left I installed the amplifier with screws and in the middle the battery. The battery is held in place by a self made Velcro harness so changing it isn't a big issue. Mount the battery with the connections to the top so that recharging is easy. On the right I mounted the battery monitor. With this setup the ammo box will also be in balance. The battery alone weighs a couple of kg.

Last but not least I wired everything up and added an Ipod for testing. Closed up the case and the sound was just great.

A nice gadget when maintaining your weapons ;-)


22 sep 2010

Review Benchmade 7 Rescue Hook


The Benchmade 7 Rescue Hook is developed by the Benchmade Knife Company, recognized as a world class U.S. manufacturer of superior military and law enforcement tactical and training knives. It is an essential part of the modern combat gear equipment; a multifunctional, lightweight, high quality, unobtrusive tool.
The Benchmade 7 ‘Rescue Hook’ is part of the Benchmade-Hook family. Other versions are the Benchmade 5,6 , 8 and the new 30100-BLK “Houdini-Pro”
The 5 and 6 are small sized (pocket size) where the 8 is a larger Benchmade Rescue Hook.

The Benchmade 7 ‘Rescue Hook’ is part of the Benchmade-Hook family. Other versions are the Benchmade 5, 6 , 8 and the new 30100-BLK “Houdini-Pro”
The 5 and 6 are small sized (pocket size) where the 8 is a larger Benchmade Rescue Hook.

The Benchmade ‘Rescue Hook’ is designed with a curved cutting head (or hook) that is designed to effectively cut various materials while offering protection from skin injury. It easily cuts trough clothing, webbings, shoe’s, combats, belts, etc. With very few force it cuts through the toughest clothing.

In these pictures we see the Benchmade 7 cutting trough combat boots and uniform clothing


The Benchmade family is constructed out of laser cut 440C Stainless Steel , and hardened to 58 to 60 HRC with a black oxide coating. The handle is covered in a black PVC coating to improve grip. 440C Stainless steel is a type of modern steel and famous for its high corrosion resistance, wear resistance, strength and hardness qualities among all the stainless alloys, capable of attaining the highest hardness (60 HRC)

In comparison to other similar tools, using the Benchmade to cut trough webbing requires far less effort.

Benchmade testresults

The choice for the Benchmade 7 is logical, it is not too small which makes it possible to use with protective gloves, easy to handle and not too big to put away. The overall length is 4.3 Inch (= 10.92 cm), the blade opening is 0.5 Inch(= 1.27 cm) and the finger opening is 1.06 Inch (= 2.7 cm). The Benchmade 7 weighs 1.6 oz (=56.7 gram).

The 7 is supplied with a nylon sheath that is molle compatible and capable of being mounted in several different configurations on your belt, tactical vest, etc. The sheath is available in black, sand and OD green.

Other than the reasons to use the Benchmade rather than a folding knife or emergency scissors is that it can be rapidly deployed and used immediately with only one hand.

This one-handed deployment allows to utilize this tool while holding a firearm, operating a radio, using a flashlight... etc. An other advantage is that it provides a safe alternative to remove flexcuffs, where a fixed- or folding blade knife could cut or wound the detainee, or be taken and used against you.

Keep in mind that although the Benchmade is an excellent rescue tool, it cannot replace a traditional tactical knife. The hooked cutting edge cannot effectively be used to cut trough certain materials such as larger diameter ropes, packing materials, etc. So, always carry both to avoid unpleasant surprises.

This concludes this review post of the Benchmade (7) Rescue Hook.
Benchmade offers a Lifetime Warranty and LifeSharp Service on all knives and tools. This service allows you to send the tool back to Benchmade for resharpening at any time (for a set fee of 5 USD)


21 sep 2010

"Striplula" magazine quick loader

Everybody have seen and used the quick loader that you find in the 5.56 ammobox in the range and in ops. But you have to be honest that sometimes they are annoying when you have to use them in teh cold, to fill 20 mags, ...


In searching for a good alternative I came across the "striplula" which is manufactured by the Israeli company "Maglula". I have to say this has been a good investment. The loader works in all kinds of weather with the minimum of effort. Not even the side of the ammocase is used ;-)
You can load the ammo while still attached on the strips or you can load cartridge by cartridge in the striplula and load them in the magazine in an instance. There is even a tool attached to unload mags very quick and easy.

Here are a couple of video's that show the "striplula" in action.


I ordered the striplula from http://www.israeli-weapons.com/store/loaders/p3.htm and paid 29$ shipping incl.