A new addition to my patch collection is this "It's f'n awesome" patch. Being a FN user I just couldn't resist. ;-) And to be honest, the patch says it all!!
I've got some spare patches, if you want one just give me a shout ;-)
Blog about Belgian gear, gadgets, accessories and other stuff for the range and Ops.
26 mei 2012
22 apr 2012
Bullet impact as art?!
Yesterday I came across a photographer's portfolio who had the stangest idea to photograph bullet impacts in different materials. The results are quite nice.
The photo's were taken by Deborah Bay and below is her website.
http://www.deborahbay.com/bigbang
The photo's were taken by Deborah Bay and below is her website.
http://www.deborahbay.com/bigbang
5 apr 2012
Training with the F2000
During last february, it was quite cold, I had the chance to do some training with the F2000 with different optics. Elcan, Aimpoint and Eotech were on the menu. They all work great and have their pros and cons. At the end of the day, there is no best of. The best optic for you, is the one that hits the spot every single time ;-)
1 apr 2012
CTOMS Slimline CFAK
Last year I attended the trainer course “Tactical Combat Casualty Care” and since then I’ve been hooked on the concept. Browsing through the internet it soon revealed that there is a lot to read on the subject but especially there are a lot of companies with great medical gear and pouches around.
I managed to purchase one from CTOMS via a friend in Canada because transport to EU is rather expensive. 100$ for one pouch is a little bit too much. Nevertheless, if you would order 1 or 20, transport would stay the same. So buy in bulk I would say ;-)
Looking up close to the Slimline CFAK, I can only say that it is a well thought of piece of kit. First of all, its constructed of 550D Cordura and takes up two Molle channels. The pouch itself is closed with a silent zipper and when opened folds open in two equal parts.
Here you can see the comparison with on the left the issued IFAK and on the right the slimmer CTOMS CFAK.
This blog post will focus on some of the TCCC pouches available. These are sold and issued under the name IFAK (Individual First Aid Kit) or CFAK (Combat First Aid Kit).
The current ABL issued IFAK pouch (more commonly known as the “Caiati trousse”) is a great pouch but it has its shortcomings. The big advantage of the pouch is that it can be ripped open exposing all the medical gear in one instance.
Negative points are that the pouch stays fixed to the MOLLE compatible vest and can’t be torn off. If the casualty is facing down with major injuries to the back, getting to his TCCC pouch contents, installed on the chest side, can be rather difficult. Another less positive point is if the CAT tourniquet is stored inside the pouch(to protect from dust and mud) the complete pouch has to be torn open to gain access. Closing it again with the attached velcro is rather difficult and probably impossible when injured.Contact-front has been looking to construct its own TCCC pouch but it is still in a development stage.
Meanwhile I came across the Canadian company ‘CTOMS’ which produces a wide range of medical supplies and gear. One of their innovating product they sell is the Slimline CFAK. I managed to purchase one from CTOMS via a friend in Canada because transport to EU is rather expensive. 100$ for one pouch is a little bit too much. Nevertheless, if you would order 1 or 20, transport would stay the same. So buy in bulk I would say ;-)
Looking up close to the Slimline CFAK, I can only say that it is a well thought of piece of kit. First of all, its constructed of 550D Cordura and takes up two Molle channels. The pouch itself is closed with a silent zipper and when opened folds open in two equal parts.
The front of the pouch reveals a separate pouch which is closed with a velcro flap to store the CAT tourniquet. It protects the CAT and you don’t have to pull open the pouch to gain access.
On both sides of the pouch you can find one channel Molle attachment to mount additional gear like for example a Benchmade Safety Cutter or combat Shears.
The zipper is covered by a velcro flap. The two zipper pulls come together at the top of the pouch where there is a pull tab that can be used to “tear” open the pouch pulling the two halves apart.
The inside of the pouch reveals a modular attachment system that can be tailored to personal preference. There is more than enough room to at least accommodate the items that can be found in the ABL IFAK. Except for the triage card and chest seal that have to be folded in two to be able to fit.The Slimline CFAK is mounted on a platform which is attached on a MOLLE system like the NFM Bear 2 vest. The platform is available as a horizontal or vertical solution. The pouch can be quickly released from the mounting panel in one motion with a pull on the beaded tab. The pouch can be easily reattached with one hand.
Here you can see the comparison with on the left the issued IFAK and on the right the slimmer CTOMS CFAK.
All in all CTOMS has designed a very innovating TCCC pouch with lot of advantages when looked at other commercialy available similar pouches.
31 mrt 2012
29 mrt 2012
ZULU NYLON GEAR mega admin pouch
For a while now, I’ve been looking around on the internet for a big enough pouch to accommodate all my small arms instruction gear like whistle, chrono, instruction sheets, safety briefings, markers, …. A lot of the time I had to search for a piece of equipment that was stowed in another place but didn’t know where I’d put it. A nice, large enough, means of stowage, would certainly help me with that. A central place to stow everything I need on the range concerning instruction.
The admin pouch is big enough to accommodate a A5 booklet. Even the width of the pouch is more than enough for a 2 cm wide booklet.
The main compartment is zippered and has elastic fittings and slots for a wide range of extra gear. The two halfs are held together with a adjustable 550 paracord but this can be removed. This feature is handy when the pouch is installed on a chest rig at chest height so that it doesn’t completely fall open, but stays at a desired angle like a tactical desktop ;-)
On the front side, the mega admin pouch also features an extra admin pouch which is completely covered with velcro for attaching your name tab or favorite morale patch. Inside you can again organize your gear due to the elastic fittings. Next to the front pouch there is another universal pouch which can be used to fit a tactical light, multitool, … The Velcro covered flap can be adjusted to your needs or completely removed.
Conclusion, I’m very happy with the Zulu Nylon Gear Mega Admin Pouch. Now I have efficient storage for all my instructional range gear.
I came across the ZULU nylon gear website and saw their mega admin pouch and ordered one. I have to say they send it very fast with tracking, but it was held up by Belgian customs. Accompanied by an extra 28€ of import taxes it finally arrived two weeks after I ordered it. Due to the tracking I could see that it arrived in BEL about two days after I ordered the pouch.
But it was worth the wait! I ordered a Coyote Brown pouch without the plastic map insert that can be bought as an option. At first glance the admin pouch is very well made with 1000d coated Cordura. Overall dimensions of the mega admin pouch is 23 cm wide x 15 cm tall x 2,5 cm deep
The admin pouch is big enough to accommodate a A5 booklet. Even the width of the pouch is more than enough for a 2 cm wide booklet.
The main compartment is zippered and has elastic fittings and slots for a wide range of extra gear. The two halfs are held together with a adjustable 550 paracord but this can be removed. This feature is handy when the pouch is installed on a chest rig at chest height so that it doesn’t completely fall open, but stays at a desired angle like a tactical desktop ;-)
On the front side, the mega admin pouch also features an extra admin pouch which is completely covered with velcro for attaching your name tab or favorite morale patch. Inside you can again organize your gear due to the elastic fittings. Next to the front pouch there is another universal pouch which can be used to fit a tactical light, multitool, … The Velcro covered flap can be adjusted to your needs or completely removed.
On left, right and bottom sides there are also extra attachment for additional gear.
On the backside there are provision for Molle attachment to be used in conjunction with Malice clips.Conclusion, I’m very happy with the Zulu Nylon Gear Mega Admin Pouch. Now I have efficient storage for all my instructional range gear.
15 feb 2012
9 jan 2012
Pmag for the FNC
If you are interested in the weapon & gear scene you've probably heard of MAGPUL. http://www.magpul.com/
MAGPUL is an innovating company which produces accessories for weapons like slings, sights, handguards, stocks, ... They even designed their own weapon system, the MASADA.
One of their most popular items is the Pmag. Made from an impact and crush resistant polymer construction, it was first announced in early 2007. The Pmag is a 30-round 5.56 NATO Polymer MAGazine for AR15/M16 platform weapons. With millions fielded to military, law enforcement, and commercial users, PMAGs have become the de facto standard for magazine reliability and durability. Since 2007 the Pmag underwent a lot of modification to be compatible with other weapon systems than the AR family. Since some time MAGPUL has Pmag M version which is fully compatible with our FN FNC. (theversion marking is visible on the bottom plate of the mag)
I have tried some Pmags and must say they feel light and platic like, because they are ;-) But after shooting a couple of mags I wasimpressed.
They claim to be stoppage free compared to the Stanag metal magazines. I checked both mags and must say that the follower is much smoother on the Pmag and doesn't tilt when pushed on one end.
Neverthless, the goldon rule still stands: Only put 28 rounds in a 30 round magazine.
Even the Pmag tend to jam the FNC when fully loaded.
I've been using them for over a year now and have had no issues what so ever. They come in a variaty of versions and colours and have their own accesories like a dust cap (included) and magpuls.
From left to right, Stanag metal mag, standard Pmag, Pmag with maglevel.
Once again, they are tough ;-)
MAGPUL is an innovating company which produces accessories for weapons like slings, sights, handguards, stocks, ... They even designed their own weapon system, the MASADA.
One of their most popular items is the Pmag. Made from an impact and crush resistant polymer construction, it was first announced in early 2007. The Pmag is a 30-round 5.56 NATO Polymer MAGazine for AR15/M16 platform weapons. With millions fielded to military, law enforcement, and commercial users, PMAGs have become the de facto standard for magazine reliability and durability. Since 2007 the Pmag underwent a lot of modification to be compatible with other weapon systems than the AR family. Since some time MAGPUL has Pmag M version which is fully compatible with our FN FNC. (theversion marking is visible on the bottom plate of the mag)
I have tried some Pmags and must say they feel light and platic like, because they are ;-) But after shooting a couple of mags I wasimpressed.
They claim to be stoppage free compared to the Stanag metal magazines. I checked both mags and must say that the follower is much smoother on the Pmag and doesn't tilt when pushed on one end.
Neverthless, the goldon rule still stands: Only put 28 rounds in a 30 round magazine.
Even the Pmag tend to jam the FNC when fully loaded.
I've been using them for over a year now and have had no issues what so ever. They come in a variaty of versions and colours and have their own accesories like a dust cap (included) and magpuls.
From left to right, Stanag metal mag, standard Pmag, Pmag with maglevel.
Once again, they are tough ;-)
26 jul 2011
Lightweigt, effective earprotection
A lot of people use the issued Comtac active earprotection headsets but when they have to be used in conjunction with the issued Schubert helmet we get into trouble.
In searching for a lightweight, effective, comfortable earprotection, I came across the Surefire Earpro EP3 Sonic Defenders.
I've been using these for about 2 years now and they are just great. No more hassle with headset and helmet. They fit perfect and can be used the whole day long.
The earpro also provides an additional stopper that can be manually inserted for even more protection.
Features
I bought mine through Ebay but it seems that they are widely available in EU for about 15€
In searching for a lightweight, effective, comfortable earprotection, I came across the Surefire Earpro EP3 Sonic Defenders.
I've been using these for about 2 years now and they are just great. No more hassle with headset and helmet. They fit perfect and can be used the whole day long.
The earpro also provides an additional stopper that can be manually inserted for even more protection.
Features
- 24dB* Noise Reduction Rating (NRR) with stoppers inserted
- Lowers potentially dangerous noise levels above 85dB
- Hear safe sound levels (with stoppers out) as if you weren't wearing ear plugs
- Ergonomic design and double-flange stem design conforms to ear shape for comfort and secure retention
- Made from hypoallergenic, medical-grade polymer that's soft, durable, and long-lasting
- Low-profile design allows you to keep them in place while wearing a mask, helmet, hat, or while using phone, headphones, or supplemental hearing muffs
I bought mine through Ebay but it seems that they are widely available in EU for about 15€
27 apr 2011
Some music after the range
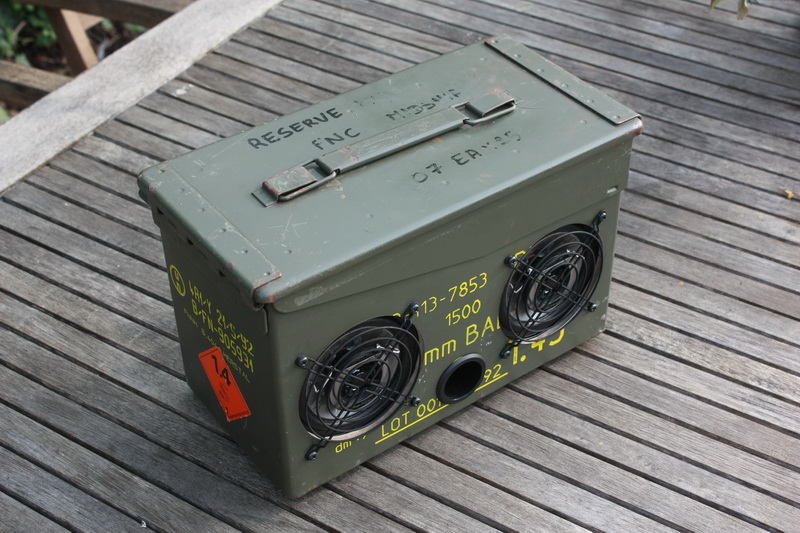
A few months ago I came accross a shop that was producing portable MP3 player in the form of wooden boxes and 50 cal ammo cases. I was keen on the idea and started searching for all the pieces so I could build one of my own.
Items needed:
In order to check the battery status I looked for a circuit that showed the status through a tri colour led. Green above 11,5V, Orange between 11,5V - 10,8V and red below 10,8V. These values can be changed with the potmeters.
http://kd1jv.qrpradio.com/batmon/batmon.HTM
I made the circuit on a experimental board and drilled a 5mm hole in the woofer tube. From the outside the battery status was visible through the bass tube.
The two fan protectors were sanded and sprayed black. After drying I cured the paint by baking the protectors in the oven for about 20 min at 200°. Try to do this without the misses at home because it tends to smell.
After mounting the speakers, protectors and switch it was time to install all electronics on the back plate. On the left I installed the amplifier with screws and in the middle the battery. The battery is held in place by a self made Velcro harness so changing it isn't a big issue. Mount the battery with the connections to the top so that recharging is easy. On the right I mounted the battery monitor. With this setup the ammo box will also be in balance. The battery alone weighs a couple of kg.
Last but not least I wired everything up and added an Ipod for testing. Closed up the case and the sound was just great.
A nice gadget when maintaining your weapons ;-)

- 50 cal ammo case
- Motorcycle amplifier 12V
- 5mm MDF plates
- Velcro
- Lead battery 12V, 11Ah
- 2ea 10cm 2 way speakers
- 2ea 12cm fan protectors
- Black spray paint
- Woofer tube
- Power switch
- Screws and washers
- Nuts and bolts
- Tech 7 glue
- DIY battery monitor
- Tri colour LED
- Audio cable
- Sanding paper
In order to check the battery status I looked for a circuit that showed the status through a tri colour led. Green above 11,5V, Orange between 11,5V - 10,8V and red below 10,8V. These values can be changed with the potmeters.
http://kd1jv.qrpradio.com/batmon/batmon.HTM
I made the circuit on a experimental board and drilled a 5mm hole in the woofer tube. From the outside the battery status was visible through the bass tube.
The two fan protectors were sanded and sprayed black. After drying I cured the paint by baking the protectors in the oven for about 20 min at 200°. Try to do this without the misses at home because it tends to smell.
After mounting the speakers, protectors and switch it was time to install all electronics on the back plate. On the left I installed the amplifier with screws and in the middle the battery. The battery is held in place by a self made Velcro harness so changing it isn't a big issue. Mount the battery with the connections to the top so that recharging is easy. On the right I mounted the battery monitor. With this setup the ammo box will also be in balance. The battery alone weighs a couple of kg.
Last but not least I wired everything up and added an Ipod for testing. Closed up the case and the sound was just great.
A nice gadget when maintaining your weapons ;-)
Abonneren op:
Posts (Atom)