26 jul 2011

Lightweigt, effective earprotection

A lot of people use the issued Comtac active earprotection headsets but when they have to be used in conjunction with the issued Schubert helmet we get into trouble.
In searching for a lightweight, effective, comfortable earprotection, I came across the Surefire Earpro EP3 Sonic Defenders.


I've been using these for about 2 years now and they are just great. No more hassle with headset and helmet. They fit perfect and can be used the whole day long.

The earpro also provides an additional stopper that can be manually inserted for even more protection.

Features
  • 24dB* Noise Reduction Rating (NRR) with stoppers inserted
  • Lowers potentially dangerous noise levels above 85dB
  • Hear safe sound levels (with stoppers out) as if you weren't wearing ear plugs
  • Ergonomic design and double-flange stem design conforms to ear shape for comfort and secure retention
  • Made from hypoallergenic, medical-grade polymer that's soft, durable, and long-lasting
  • Low-profile design allows you to keep them in place while wearing a mask, helmet, hat, or while using phone, headphones, or supplemental hearing muffs
Even for people with bigger or smaller ears, Surefire provides different sizes. (S, M & L)

I bought mine through Ebay but it seems that they are widely available in EU for about 15€

27 apr 2011

Some music after the range

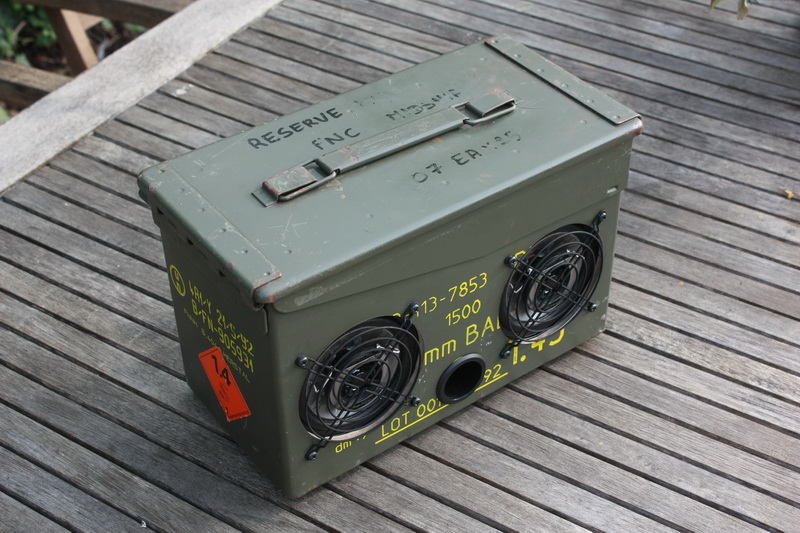
A few months ago I came accross a shop that was producing portable MP3 player in the form of wooden boxes and 50 cal ammo cases. I was keen on the idea and started searching for all the pieces so I could build one of my own.


Items needed:
  • 50 cal ammo case
  • Motorcycle amplifier 12V
  • 5mm MDF plates
  • Velcro
  • Lead battery 12V, 11Ah
  • 2ea 10cm 2 way speakers
  • 2ea 12cm fan protectors
  • Black spray paint
  • Woofer tube
  • Power switch
  • Screws and washers
  • Nuts and bolts
  • Tech 7 glue
  • DIY battery monitor
  • Tri colour LED
  • Audio cable
  • Sanding paper
I started out cutting the speaker and speaker mounting holes on the side of the ammo case. Not forgetting the smaller woofer hole in between. On the side I drilled a hole to install the power switch. When drilling make sure the switch will be positioned so that you can manipulate it from the hole in the side open/closing lever of the ammo case. Then I trimmed the MDF plate so it would fit nicely inside the case. The back plate was trimmed to the full interior length of the case. The previous cut out holes were transferred on the front MDF plate and cut out. Using Tech 7 I glued the MDF plates into place with the exception of the back plate. This should be able to slide out if necessary because I was planning to mount all electronics and battery on it.

In order to check the battery status I looked for a circuit that showed the status through a tri colour led. Green above 11,5V, Orange between 11,5V - 10,8V and red below 10,8V. These values can be changed with the potmeters.
http://kd1jv.qrpradio.com/batmon/batmon.HTM

I made the circuit on a experimental board and drilled a 5mm hole in the woofer tube. From the outside the battery status was visible through the bass tube.
The two fan protectors were sanded and sprayed black. After drying I cured the paint by baking the protectors in the oven for about 20 min at 200°. Try to do this without the misses at home because it tends to smell.

After mounting the speakers, protectors and switch it was time to install all electronics on the back plate. On the left I installed the amplifier with screws and in the middle the battery. The battery is held in place by a self made Velcro harness so changing it isn't a big issue. Mount the battery with the connections to the top so that recharging is easy. On the right I mounted the battery monitor. With this setup the ammo box will also be in balance. The battery alone weighs a couple of kg.

Last but not least I wired everything up and added an Ipod for testing. Closed up the case and the sound was just great.

A nice gadget when maintaining your weapons ;-)


2 mrt 2011

The best of two worlds, the ultimate holster for your sidearm!

During a instruction course in Leopoldsburg I got to know a guy from 1para who was leaving in a couple of weeks for OMLT ops in afghanistan. He was complaining about some shortcomings on the current issue tactical sidearm holster. He was on a quest for the ultimate FN Browning High Power, alias GP (Grand Puisance), holster. One that would draw fast, wasn't pulling constantly your belt down and still would stay in place when running after the bad guys.

You have to know there are dozens of good systems out there but all them have some negative points one way or the other. For example there are only a couple of brands who make holsters for the GP like Fobus and Safariland.
Safariland must be one of the best systems on the market. They use a quick release locking lever to secure the sidearm in the holster wich is made out of strong and durable Kidex.
On the other hand these brands use only one wide strap of webbing to attach the holster to the belt.
Blackhawk was aware of this problem and introduced the CQC system where the platform is atached to the belt with two seperate hinged straps deviding the pullforce on the belt in half.

So we got a winner? .... Nope, they don't make holsters for the GP :-(

What if we merged the two best features of both systems together? Wouldn't that be a nice wedding?.
Here's the result. Holster from Safariland and legpannel from Blackhawk.


20 feb 2011

Belgian Defence acquired the new version of the CAT, "Combat Application Tourniquet". 
The improved features of the CAT are:

-white Self-adhering band with "Time" indications so that the time of fixing the CAT can be noted directly on it. 
-the windlass rod is thickend in the middle because earlier version tended to brake when used under stress.

28 nov 2010

Belgian Defence chooses Aimpoint M4

Recently, the Belgian Defence adapted about 800 Aimpoint M4 to put on the standard issue FN FNC. The first batch was distributed to the Belgian OMLT's in Afghanistan.


More info about the Aimpoint M4.

The earlier adapted Eotech 522 are only for use with the FN F2000 Tactical.

11 okt 2010

Belgian Military Championship Combat Shooting

During 4-7 october the "Belgian Military Championship Combat Shooting" was held in March en Famenne.
Here's some video footage from stage 2 and 3 taken with a V.I.O. shoulder mounted camera.


10 okt 2010

Tap Rack Patch ;-)

This is one that can get you into trouble and get you out of it by ensuring you never forget an important combat shooting skill.
Tap Rack is an important firearms drill that is learned during SOIT (Schoots Onderricht /Instruction de tir). When a weapon jams in a firefight, the first thing you do is a Tap Rack procedure. In other words the safest thing you can do to get your weapon operational and return fire as quickly as possible. The correct procedure is Tap (Push the magazine solidly into your weapon to get a misfed round ready) Rack (Operate the charging handle and assist as necessary to chamber the round) Bang (Pull the trigger and get that round downrange and into the enemy before they get theirs into you.


22 sep 2010

Review Benchmade 7 Rescue Hook


The Benchmade 7 Rescue Hook is developed by the Benchmade Knife Company, recognized as a world class U.S. manufacturer of superior military and law enforcement tactical and training knives. It is an essential part of the modern combat gear equipment; a multifunctional, lightweight, high quality, unobtrusive tool.
The Benchmade 7 ‘Rescue Hook’ is part of the Benchmade-Hook family. Other versions are the Benchmade 5,6 , 8 and the new 30100-BLK “Houdini-Pro”
The 5 and 6 are small sized (pocket size) where the 8 is a larger Benchmade Rescue Hook.

The Benchmade 7 ‘Rescue Hook’ is part of the Benchmade-Hook family. Other versions are the Benchmade 5, 6 , 8 and the new 30100-BLK “Houdini-Pro”
The 5 and 6 are small sized (pocket size) where the 8 is a larger Benchmade Rescue Hook.

The Benchmade ‘Rescue Hook’ is designed with a curved cutting head (or hook) that is designed to effectively cut various materials while offering protection from skin injury. It easily cuts trough clothing, webbings, shoe’s, combats, belts, etc. With very few force it cuts through the toughest clothing.

In these pictures we see the Benchmade 7 cutting trough combat boots and uniform clothing


The Benchmade family is constructed out of laser cut 440C Stainless Steel , and hardened to 58 to 60 HRC with a black oxide coating. The handle is covered in a black PVC coating to improve grip. 440C Stainless steel is a type of modern steel and famous for its high corrosion resistance, wear resistance, strength and hardness qualities among all the stainless alloys, capable of attaining the highest hardness (60 HRC)

In comparison to other similar tools, using the Benchmade to cut trough webbing requires far less effort.

Benchmade testresults

The choice for the Benchmade 7 is logical, it is not too small which makes it possible to use with protective gloves, easy to handle and not too big to put away. The overall length is 4.3 Inch (= 10.92 cm), the blade opening is 0.5 Inch(= 1.27 cm) and the finger opening is 1.06 Inch (= 2.7 cm). The Benchmade 7 weighs 1.6 oz (=56.7 gram).

The 7 is supplied with a nylon sheath that is molle compatible and capable of being mounted in several different configurations on your belt, tactical vest, etc. The sheath is available in black, sand and OD green.

Other than the reasons to use the Benchmade rather than a folding knife or emergency scissors is that it can be rapidly deployed and used immediately with only one hand.

This one-handed deployment allows to utilize this tool while holding a firearm, operating a radio, using a flashlight... etc. An other advantage is that it provides a safe alternative to remove flexcuffs, where a fixed- or folding blade knife could cut or wound the detainee, or be taken and used against you.

Keep in mind that although the Benchmade is an excellent rescue tool, it cannot replace a traditional tactical knife. The hooked cutting edge cannot effectively be used to cut trough certain materials such as larger diameter ropes, packing materials, etc. So, always carry both to avoid unpleasant surprises.

This concludes this review post of the Benchmade (7) Rescue Hook.
Benchmade offers a Lifetime Warranty and LifeSharp Service on all knives and tools. This service allows you to send the tool back to Benchmade for resharpening at any time (for a set fee of 5 USD)


Solution for dead space "Bear II vest"

A couple of "Contact Front" members came up with a solution to existing problem found on the Belgian issue "Bear II vest". The space in front of the zipper uses up 2 Molle channels. These channels could be used to put othet pouches like a flashlight pouch or even a triple magazine pouch. Nevertheless it still remains a zippered vest with the begative side that you can't put it on over your head like a CIRAS type plate carrier. You need to use the zipper toput in on.
It was a challenge to find a solution but we came up with a adapter in two parts which attaches on both sides of the zipper and when closed with velcro, overlaps the zipper.

I allready did some tests on the range and it seems that a full loaded triple magazien pouch (about 2,25kg) is a bit to heavy for the velcro. We are looking to solve this problem asap.


21 sep 2010

"Striplula" magazine quick loader

Everybody have seen and used the quick loader that you find in the 5.56 ammobox in the range and in ops. But you have to be honest that sometimes they are annoying when you have to use them in teh cold, to fill 20 mags, ...


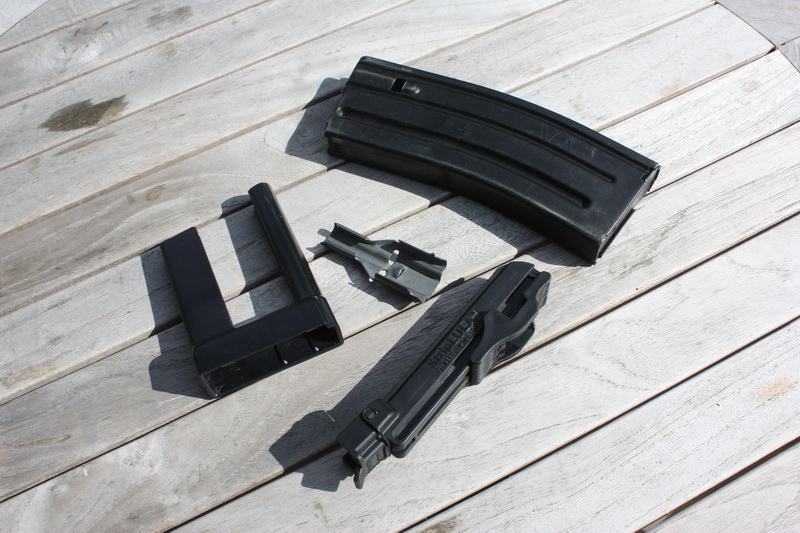
In searching for a good alternative I came across the "striplula" which is manufactured by the Israeli company "Maglula". I have to say this has been a good investment. The loader works in all kinds of weather with the minimum of effort. Not even the side of the ammocase is used ;-)
You can load the ammo while still attached on the strips or you can load cartridge by cartridge in the striplula and load them in the magazine in an instance. There is even a tool attached to unload mags very quick and easy.

Here are a couple of video's that show the "striplula" in action.


I ordered the striplula from http://www.israeli-weapons.com/store/loaders/p3.htm and paid 29$ shipping incl.